THE PROBLEM WITH GROWING TROPICAL MILKWEED
Milkweeds are having a moment! A host plant to the charismatic (and struggling) Monarch Butterfly (Danaus plexippus), many Texans have been adding milkweed cultivars to their lawnscaping efforts in recent years. As we have become more informed as consumers, there has been a slow but steady movement away from exotic species like the now much maligned Tropical Milkweed (Asclepias curassavica).
That’s wonderful news in our minds! Texas has many beautiful species of milkweed, and they deserve our attention, and we will discuss a bit of our experience cultivating a few of them a little later. First, a little background on one fatal flaw in the mass propagation of Tropical Milkweed, and the two-fold problem.
Tropical milkweed is lovely to look at. It’s just as attractive to us as it is to monarchs. It’s easy to propagate, and readily available for purchase. It also has a very different growth habit than our native species. Herein lies the first problem. In many areas, Tropical Milkweed stays green far longer than our natives, encouraging monarchs to delay migration, or even begin breeding in their overwintering sites. For the monarchs, this means their reproductive cycle is out of sync with their environment, and can lead to mass failures of monarch generations.
Worse than that, pathogens can be spread from plant to plant by mobile adults. Pseudomonas and Nuclear Polyhedrosis Virus can cause caterpillars to blacken and die, releasing viral particles to infect more caterpillars before they even reach the chrysalis stage. A protozoan parasite called Ophryocystis elektroscirrha (we will call it OE for short) can cause reductions in body mass and lower migratory success for monarchs.
The short of it is that Tropical Milkweed stays on the landscape longer than our native species. Much longer. This gives OE in particular an opportunity to build up in higher and higher densities on Tropical Milkweed over time. Each successive generation of monarch caterpillar’s chances of successfully metamorphosing to adulthood is diminished. How does that differ from our native species you ask? Every season, as the temperatures cool, the photosynthetic parts of our native milkweed species (the stalks and foliage above ground) die back. Every spring fresh, new, clean foliage is grown; ready to receive the tiny baby butterflies.
PROPAGATING NATIVE TEXAS MILKWEEDS
There are several organizations (such as Monarch Watch) that are now making native milkweed species more available for purchase, and in quantities for large-scale habitat work. The main species we have come across in cultivation are Asclepias viridis, aka Green Milkweed, and Asclepias asperula aka Antelope Horns Milkweed (adorably named for it’s distinctive seed pod!). Both of these species are hardy, and can often be seen growing in calcareous soils along highways in Texas (if one is observant enough to note the lime greenish balls of blooms peeking over the grasses).
These species are wonderful for those of us who have well draining soil comprised of more mineral than organic matter, and often forget to water our gardens regularly (We aren’t speaking from experience or anything…). The blooms are long-lived, but due to their greenish hue, they may not be particularly showy, and their watering requirements may make them a bit difficult to integrate into mixed species garden beds.
Knowing that we have so many really beautiful native milkweeds with differing requirements, we decided to try our hand at growing a few. After a lot of looking, and a lot of fussy seed starting instructions, and a lot of incredibly variable information, we decided to return to kindergarten. Do you remember taking beans and putting them in damp paper towels in a sandwich bag? We do, and that’s where we started. The difference is, we weren’t trying to germinate the seeds. We were trying to simulate the natural dormancy period the seeds would go through. We call this cold stratification.
COLD STRATIFICATION
The process is with clean hands, moisten a paper towel (no liquid should be dripping off), and fold several seeds inside. These folded paper towels should be placed in a ziploc bag, and stored in a refrigerator. We tried the same method with two different species of milkweed (Asclepias syriaca aka Common Milkweed, and Asclepias verticillata aka Whorled milkweed). The information we found on length of time to cold stratify was so variable that we tried different time frames. Three days, Two weeks, and four weeks.
The seeds that were cold stratified for three days were placed in a potting soil substrate, in a terra cotta pot. 1 sprouted after about a week, and grew very slowly. We likely need to try three days of cold stratification with the same treatment as the two week and four week group to see if the results are still super different.
We found that after two weeks of cold stratification, about 80% of our seeds germinated (sprouting within 3 days). The whorled milkweed was slightly less vigorous than the common milkweed seedlings. We were pleasantly surprised that we were so successful, as through the course of our reading, and conversations with botanists, we learned that low germination rates were common.
So, while we waited out the additional two weeks for our second set of seeds to come out of cold stratification (the refrigerator), we did some more reading, and talking to botanists, and found that there is some evidence to support the idea that some Asclepias have a species specific mutualistic relationship with mycorrhizae. Mycorrhizae are a group of fungi that have made legumes so famous for their nitrogen fixing abilities. What we don’t hear about as often, is their ability to increase the surface area of root structures, and break down nutrients in soil to make them more bio-available to the plants who’s roots they live on.
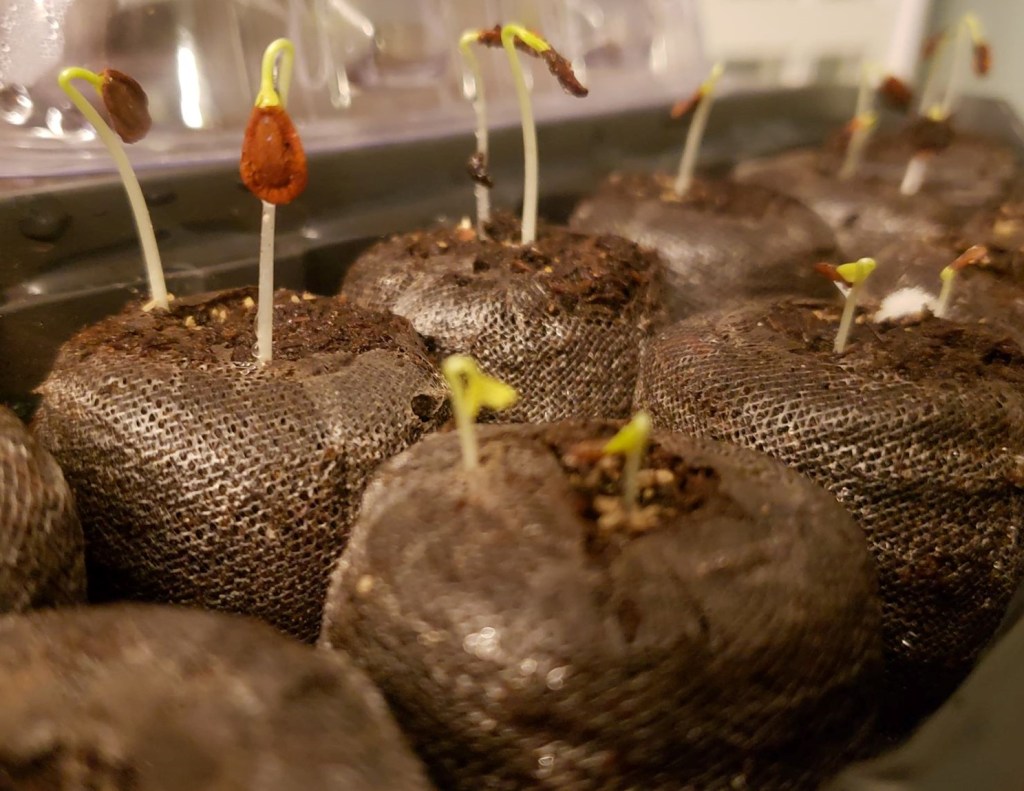
So, taking this information, and unable to uncover the exact species of mycorrhizal fungus, we used a multi-species granular mycorrhizae product to coat each of the seeds from the 4 week stratification batch before poking them into peat pellets and setting them in seed starter trays. Toothpicks work really well for dipping the moist seeds into the mycorrhizal mix, and poking the seeds into rehydrated peat pellets for germination.
This round of seeds had a nearly 100% germination rate, sprouting within 2 days! It’s unclear if it was the addition of the mycorrhizae or the longer cold stratification time, but this second group of seedlings caught up with the growth of the first group pretty quickly, and even surpassed the older seedlings.
We began placing the seedlings outside, on a covered porch, slowly increasing the length of time we left them out once they were too tall for the seed starting tray lid and had at least one set of true leaves.
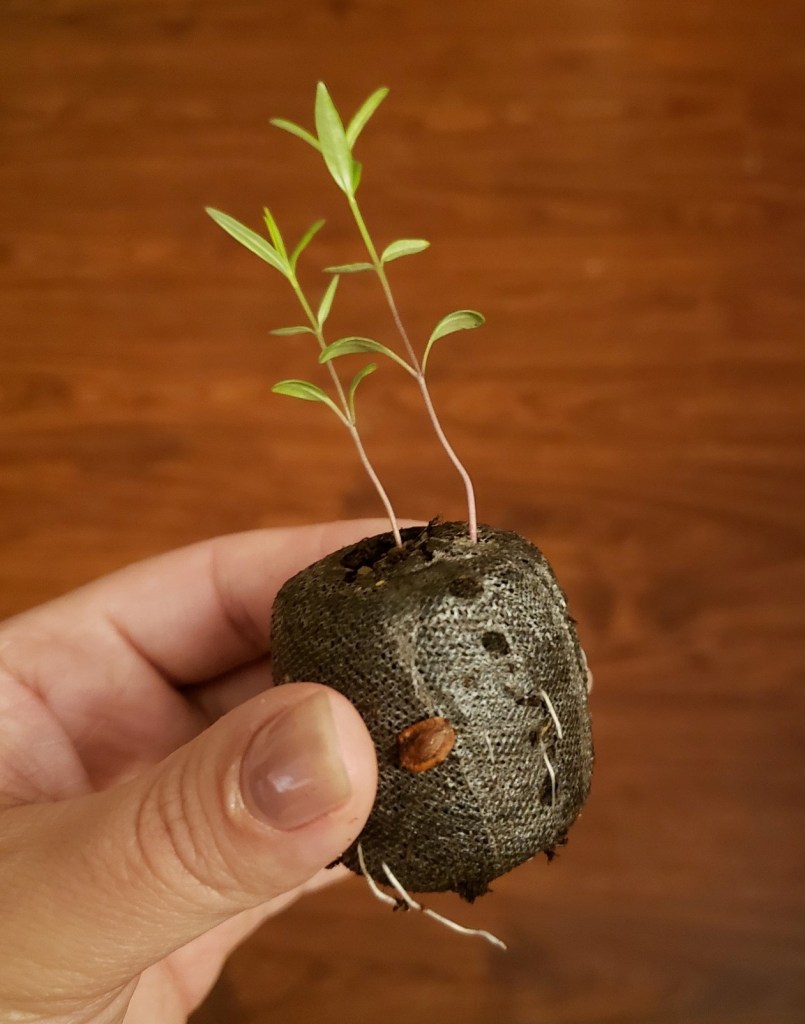
When our seedlings had about two inches of growth, and several sets of leaves, we peeled the wrappers off the peat pellets, and transplanted the seedlings into nursery pots with potting soil. Some of these were biodegradable fiber pots, and some were re-used plastic nursery pots. We ended up with more than 24 seedlings! They were now outside 24 hours a day.
The seedlings stayed in the pots for quite some time, and some got stressed and died, and several stopped growing (perhaps we should have mixed additional mycorrhizae into the potting soil before planting-we will try this next, though mycorrhizae are much more effective if introduced in direct contact with the root mass of the plant). Our very first seedling, from our three day cold stratification group developed a black spot that spread, and turned yellow. That seedling never grew beyond getting it’s first set of true leaves, and ended up dying. Surprisingly, a second seedling began growing in the pot. It is still very tiny and seems stunted.
The seedlings have now been planted in the ground, and are growing tremendously. Likely, they needed to be transplanted in the ground sooner, as they seem to have tripled in size in a week! We will be testing our cultivation method again, but we were pretty successful! Perhaps this less fussy method of cold stratification and germination will motivate others to give it a go! Here’s the synopsis if you don’t want to sift!
“THE RECIPE”
- Cold stratify your seeds for four weeks by folding them in a damp paper towel, placing the paper towel in a sandwich bag, and leaving it in your fridge (don’t forget to label it with species and date!)
- using a seed starting tray, rehydrate peat pellets, and coat seeds in granular mycorrhizae one at a time.
- Pick up the individual seed coated in mycorrhizae with a toothpick, and push it (gently) into a peat pellet. Note: we have found that planting them pointy side down helps the seedling orient its self better. Several of our seedlings sprouted upside down, and we had to gently help them get turned around!).
- Once you have all your seeds in peat pellets inside your seed starting tray, put the lid on it, and place your seed starting tray on a heating pad (you can use the kind from the pharmacy, but look for one that has an option to stay on instead of cutting off after two hours).
- when your seeds have sprouted, and begin to touch the lid, you can keep the lid off, but make sure that the peat pods stay moist! You can also begin setting your seedlings outside for an hour or so at a time (assuming it’s warm enough outside!).
- Once your seedlings have several sets of true leaves, and have been doing well outside at all times, the wrapper can be removed from the peat pellet, and the seedling can be transplanted into a nursery pot.
- Allow your seedlings to get used to their nursery pot drying out between waterings, but not for long periods of time (we watered ours every other day, then every 2 days before planting them in soil).
This method has worked for Common Milkweed (Asclepias syriaca) and Whorled Milkweed (Asclepias verticillata) so far, and we will be trying it with Rose Milkweed (Asclepias incarnata) very soon! Maybe we will get to see blooms from these guys this year 🙂
Did you know that milkweed supports other native wildlife too?
